
Haven’t set up your MX records yet?
Forget about creating the perfect campaign and booking meetings!
Without MX records, you won’t succeed with cold email outreach.
Why?
You won’t receive the replies!
And without replies…well…we think you see how important MX records are.
By the end of this guide, you’ll know exactly how to set up MX records for your domain so you can receive those valuable responses that move the needle.
MX records tell sending servers where to route email
MX records tell sending servers where to route incoming email. More specifically, MX records specify the receiving email server for a domain.
For small businesses, your hosting or domain provider usually supplies MX records. You only need to worry about them when changing providers.
Here’s a more elaborate explanation of what MX records are.
How do MX records work?
Your domain is like your home address, but it doesn’t necessarily have a built-in mailbox (mail server).
Instead, you use a mail provider like Gmail to receive emails.
MX records tell the internet where to send your emails, directing them to the right mail server. Without MX records, incoming emails wouldn’t know where to go.

Why do you need DNS MX records?
DNS MX (Mail Exchange) records are crucial for your cold outreach campaigns.
They help you:
1. Route incoming emails to your mail server:
MX records tell other mail servers where to deliver emails sent to your domain.
Without correct MX records, emails sent to your domain (e.g., sales@example.com) would not know where to go, leading to non-delivery.
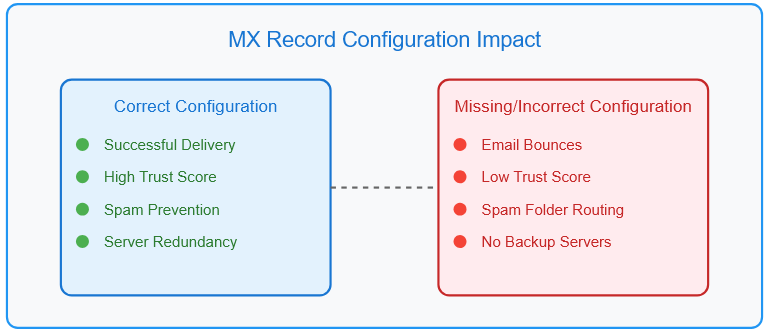
2. Boost email deliverability:
Setting up your MX records also helps maintain your outgoing email deliverability.
Email servers use MX records to check if your domain can receive email. When set up right, it shows other mail servers that your domain is legitimate and trustworthy.
If your MX records are missing or wrong, it can affect the deliverability of your outgoing emails. Your emails could end up in recipients’ spam folders or bounce back.
3. Ensure backup and reliability:
Setting up multiple MX records with different priorities adds redundancy to your email system.
If the primary mail server is unavailable, the email can be routed to a secondary server.
This redundancy ensures smooth, uninterrupted email outreach.
MX record example
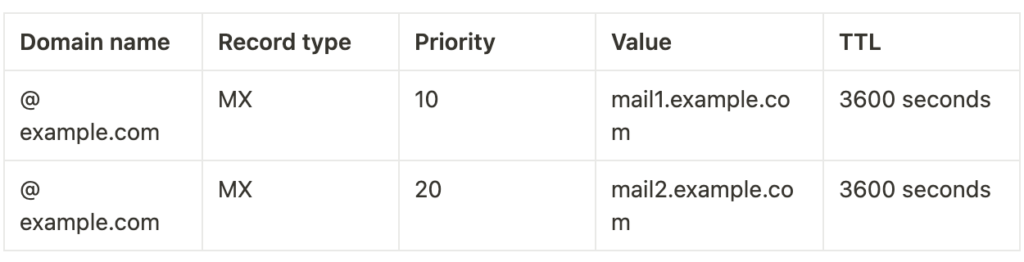
Here’s what MX records look like:
And here’s an existing MX records example from lemlist:

A DNS MX record consists of Hostname, Type, TTL, Priority/Preference, and Value
This is what these parts stand for:
- Hostname: This is your domain name. A hostname and IP simply indicate to what domain emails will be sent.
- Type: Type specifies the kind of DNS record being created. For MX (Mail Exchange) records, it is essential to set the type correctly to ensure the record works.
- TTL (Time to Live): The time (in seconds) that servers cache an MX record. It’s often set to Auto by default but can be adjusted (e.g., 3600 seconds = 1 hour).
- Priority: Defines the order in which mail servers should attempt delivery. Lower numbers are tried first. If two records have the same priority, the sending mail server randomly selects one.
- Value: Contains your provider’s email server address (MX address).
How do MX records work?
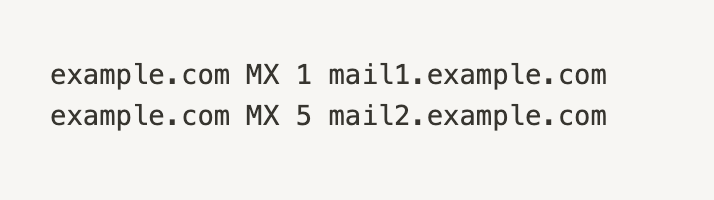
When an email is sent to user@example.com, the sender’s mail server queries the DNS for the MX records of example.com.
Let’s say the DNS query returns both MX records (see example above):
The server will attempt to deliver the email to mail1.example.com first because it has the highest priority (lowest number).
If mail1.example.com is unavailable, the sending server will try mail2.example.com as a fallback.
Therefore, having multiple MX records for your domain is important if a receiving server experiences issues.
Check your existing records first – Perform a DNS record lookup
Before jumping into setting up your MX records, let’s check your domain’s existing DNS records.
You could already have your domain’s MX records set up without you knowing.
You can check your MX records with lemlist. Here’s how:
- On the lemlist dashboard, click on your profile name and then “settings”
- Now click on “Account health”
- Next go to the “DNS health” tab
- On the “Select a sender” dropdown menu, select the account you want to run the DNS checks for
- Finally, click on “Refresh checks”
- Check your results!
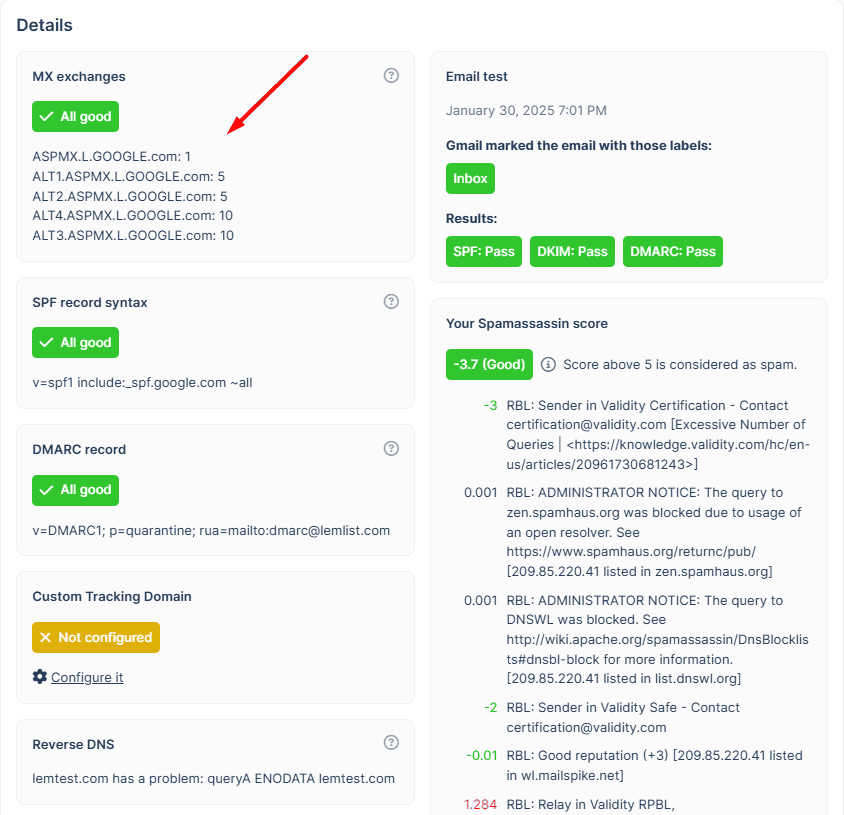
In this example, the domain is using Google email servers to receive emails.
For more info on how to check your domain’s DNS records with lemlist’s DNS checks, visit: Check your DNS set up with lemlist.
lemlist has a free 14-day trial, so you can test drive the DNS checks and other features for free.
However, if all you need is a quick check if your MX records are in order, you can also use our Free Deliverability Setup Checker. It won’t show you the exact MX records but will tell you if they are “good” or not.
If the lookup tools show your domain doesn’t have MX records set up, it’s time to get to work in the next section:
Here’s how to set up MX records
We’ll now show you how to set your MX records with Google and Microsoft Office.
Let’s start with the big ol’ G:
Adding Google Workspace MX records
Where to set up?
You don’t set up your MX records on Google Workspace itself.
Instead, you have to take Google’s MX records and set them up on your domain registrar’s website (or hosting service).
Do I have to set up multiple MX records with different priorities?
Traditionally, yes! However, since April 2023, Google made using just a single MX record possible. But if you started using Workspace before 2023, you must also add the backup servers.
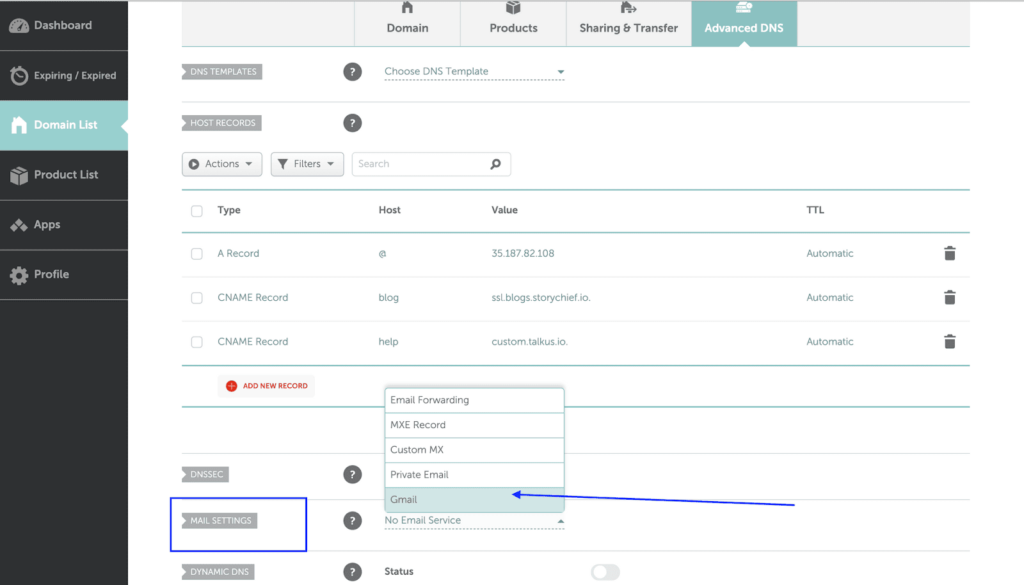
How to set up MX records for Google on Namecheap
On Namecheap, setting up your Google MX records only takes a few steps:
- Go to Advanced DNS settings
- Scroll to Mail Settings
- Choose “Gmail”
- Save it!
How to create MX records for Google and Cloudflare
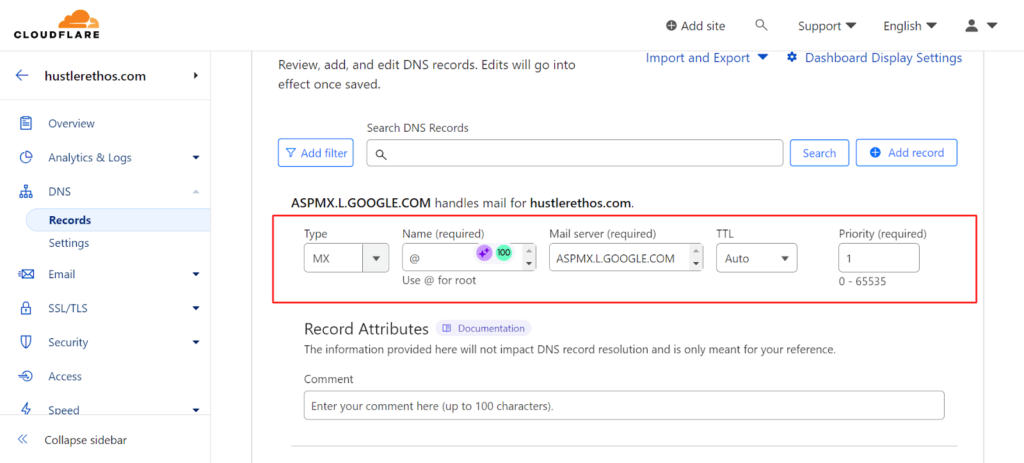
On Cloudflare, you’ll need to create MX records manually:
- Log in to Cloudflare
- Go to Domain list and choose your domain
- Go to DNS
- Click on “Add new record”
- Choose MX record
- Put @ in “Name”
- Put SMTP.GOOGLE.COM in mail server. If you started using Workspace before 2023, use ASPMX.L.GOOGLE.COM* instead.
- Choose priority = 1
*Also add the following MX records for the backup servers:
ALT1.ASPMX.L.GOOGLE.COM priority = 5
ALT2.ASPMX.L.GOOGLE.COM priority = 5
ALT3.ASPMX.L.GOOGLE.COM priority = 10
ALT4.ASPMX.L.GOOGLE.COM priority = 10
How to add Google MX records to Bluehost
We’ll need to create MX records manually:
- Select your domain on the Domains tab
- Now select select Advanced Tools, and click Manage
- Click Add Record
- Click on “Add new record”
- Choose MX record
- Put @ in “Name”
- Put SMTP.GOOGLE.COM in mail server. If you started using Workspace before 2023, use ASPMX.L.GOOGLE.COM* instead.
- Choose priority = 1
- Save it!
*Also add the following MX records for the backup servers:
ALT1.ASPMX.L.GOOGLE.COM priority = 5
ALT2.ASPMX.L.GOOGLE.COM priority = 5
ALT3.ASPMX.L.GOOGLE.COM priority = 10
ALT4.ASPMX.L.GOOGLE.COM priority = 10
Save it!
How to set up Google MX records for all domain and hosting providers
This is a general step-by-step checklist for setting up your Google MX records for all providers.
Since there are different steps for different providers, the steps are not exact. However, they should help you configure your records either way.
In case you need additional information, check Google’s documentation on MX records.
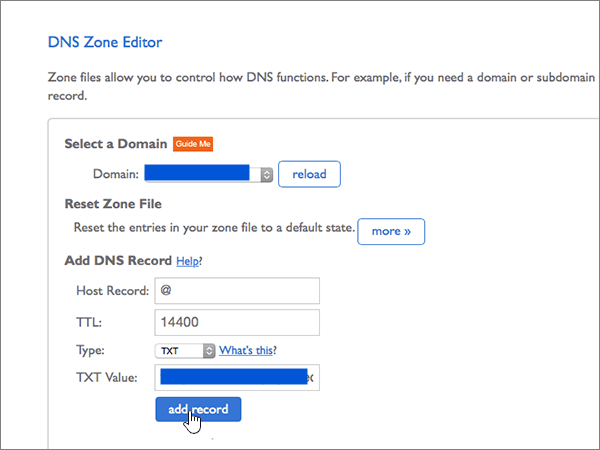
1. Log in to Your Domain Registrar: Access the account where you registered your domain. Sometimes, you’ll find your domain’s DNS settings in your hosting provider’s account.
2. Locate the DNS Management Page: Find the section for managing DNS records, often labeled as “DNS Management,” “Name Server Management,” or similar.
3. Select the Domain: Choose the specific domain you want to configure.
4. Open the DNS Manager: Navigate to the DNS Manager or DNS Zone Editor, where you can add or edit DNS records.
5. Delete Existing MX Records (Optional but recommended): If there are any existing MX records that are different to the ones you want to add, delete them to avoid conflicts.
6. Add Google’s MX Records:
Started using Workspace after April 2023? Add only this server: SMTP.GOOGLE.COM. Put @ in “Name” and set the priority to one.
Started using Workspace before 2023? Add the records below:
| Host/Domain | Type | Priority | Value | TTL |
| @ | MX | 1 | aspmx.l.google.com | 3600 |
| @ | MX | 5 | alt1.aspmx.l.google.com | 3600 |
| @ | MX | 5 | alt2.aspmx.l.google.com | 3600 |
| @ | MX | 10 | alt3.aspmx.l.google.com | 3600 |
| @ | MX | 10 | alt4.aspmx.l.google.com | 3600 |
7. Save the MX Records: Click “Save” or “Add Record” to update your DNS settings.
8. Wait for DNS Propagation: DNS changes can take anywhere from a few minutes to up to 48 hours to propagate globally.
9/ Verify MX Record Setup: Use lemlist’s DNS checks or any other DNS lookup tool to verify that the MX records have been correctly added to your domain.
Note: For some domain registrars, Google will automatically set up the MX records for you.
Microsoft Office MX records setup example
If Microsoft Office 365 is your email provider choice, we’ve got your back, too.
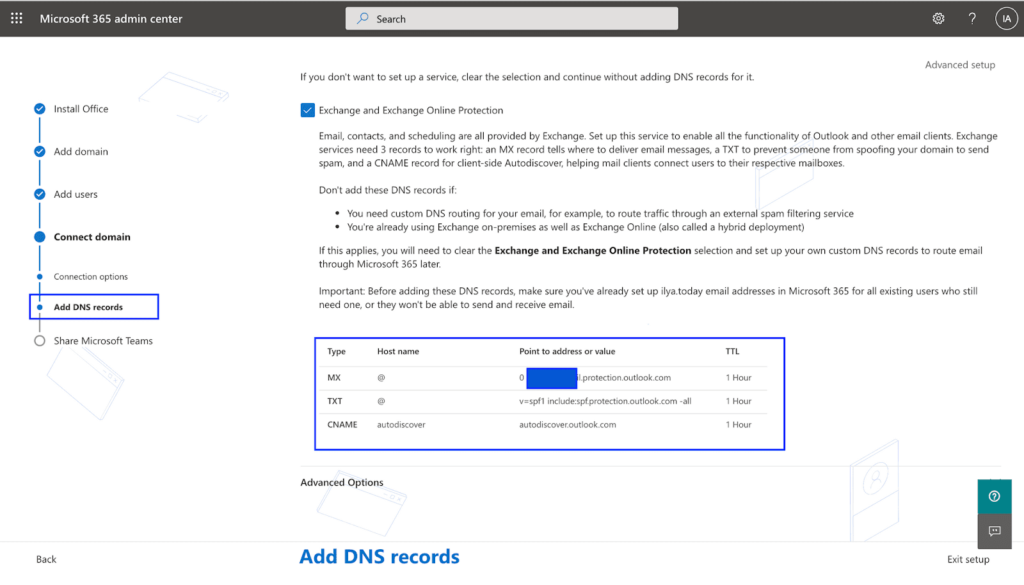
The MX record to add will be provided by Microsoft. Here’s how to find it:
- Log in to Office 365 and go to the Settings > Domains page
- The MX record to add is under Required DNS settings. The record follows this format: MX token>.mail.protection.outlook.com.
Alternatively, it will also appear during the initial setup. ⬇️

When to Avoid Using Microsoft’s Default MX Record
In most cases, you should use the provided MX record. However, don’t use it if:
- You need custom DNS routing, for example, to route traffic through an external spam filtering service.
- You’re using both Exchange on-premises and Exchange Online (also called a hybrid deployment).
How to set up MX records on Microsoft Office 365 for Namecheap
- Go to Advanced DNS settings
- Scroll to Mail Settings
- Create MX record*
- Save it!
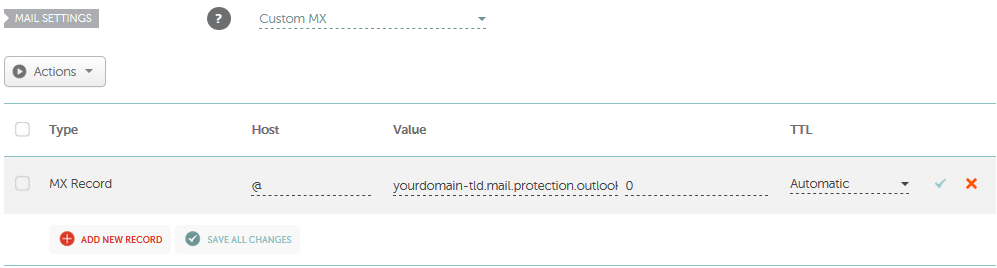
*You can take this MX record from Microsoft during your initial setup:
How to configure MX records for Microsoft Office 365 and Cloudflare
- Select your domain and go to DNS
- Click on Add Record
- Choose MX as the record’s type
- Add your Office 365 MX record*
- Save

*You can take this MX record from Microsoft during your initial setup:

How to add MX records for Microsoft Office 365 and Bluehost
- Select your domain on the Domains tab
- Now select select Advanced Tools, and click Manage
- Click Add Record
- Choose MX record as the type
- Fill in the other information*
- Save it!
*You can take this MX record from Microsoft during your initial set-up:
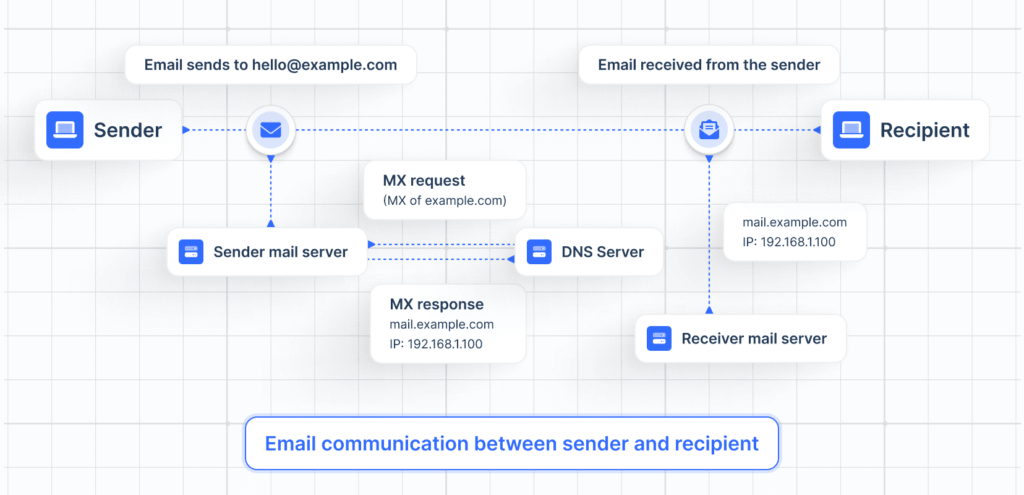
Email Communication explained
DNS MX records play a critical role in the entire email communication process. To understand their importance, let’s first look at how email communication works.
What is email communication?
Email is a method of communication that uses electronic devices to send messages over computer networks. In simple language, we call it “email,” which is short for electronic mail.
“Email” refers to both the delivery system and individual messages that are sent and received.
Here’s a step-by-step breakdown of what happens when you send an email:
1. Email Creation: You write and send an email using an email client like Gmail
2. Initial Sending: The email client connects to your SMTP (Simple Mail Transfer Protocol) server to send the email
3. DNS Lookup: The sending SMTP server performs a DNS lookup for the recipient’s domain to find the MX (Mail Exchange) records
4. MX Records Retrieval: The DNS system returns the MX records. Through these records, the sending server knows where to route the email. Each MX record has a priority.
Example:
5. Email Routing: The sending SMTP server tries to connect to the highest-priority mail server first (mail1.example.com). If unavailable, it attempts the next priority (mail2.example.com).
6. Mail Server Acceptance: The recipient’s mail server receives the email and stores it
7. Email Delivery: The recipient’s email client retrieves the email from their mail server using IMAP (Internet Message Access Protocol) or POP3 (Post Office Protocol)
Key takeaways
- Setting up your MX record means allowing emails to come to your inbox in the first place
- Not having your MX records set up can also negatively affect the deliverability of your outgoing emails
- The setup of MX records isn’t difficult as long as you have a tutorial to follow – anybody can do it
☝️ Once you configure your MX records, the job is not done. Set up other DNS records like SPF, DKIM, and DMARC next. Then audit your email sender reputation.
Which other DNS records do you need for lemlist?
You need to set up your SPF, DMARC, and DKIM records. Setting them up will ensure a good foundation for email deliverability. This is a must before running your first campaign or even sending any email.
Can I have multiple MX records for my domain?
Of course. That’s what the priority setting is for. Setting up multiple MX records allows you to have backup servers if any server experiences issues.
How to check your current MX records?
One of the easiest ways to check the MX records of any domain is to use the command prompt on your computer.
1. Open the command prompt or terminal
2. Type or paste the following command and hit enter: “nslookup -type=MX yourdomain.com” Make sure to change the domain name to your domain.
3. If you already have your MX records set up, you should now see them on your screen
Alternatively, use lemlist’s DNS Checks.

SEO content writer helping B2B brands grow - Working remotely from sunny Costa Rica

